Hi everybody. In this new tutorial I'm going to show you how to create a Web-service using our job with the
so we can run it from an Internet browser.
1. Introduction
Before I start this tutorial I want to thank Ian Mayo for sponsoring this article in support of PlanetMayo Open Source projects.
To do so, we will follow the next steps :
- Export our Talend job as a Web-service.
- Deploy it in a Web-server.
- Run it from a HTML page.
2. Export Job :
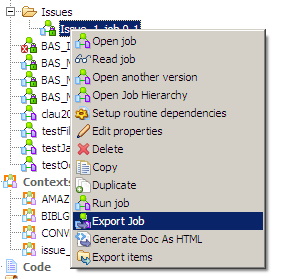
Exporting tje job as a webserice is very esay. All we have to do is to go to the "Repository view" and right click on "Job Designs" then we choose "Export Job" to open the Export Job Scripts wizard :
In the Export Job Scripts wizard we click "Browse..." button next to the to "archive file" field to specify the path of the generated "WAR" file. In the "Export type" area we select "Axis WebService (WAR)" then we click on "Finish".
3. Deploying in the Web-server :
After we have generated the "WAR" file we are going to deploy it in our web-server. To do that I'm going to use "Tomcat server" but you can use any other java web-server.
Deploying in "Tomcat server" si quit simple. All we do is to copy the "WAR" file generated by "Talend" and paste it in the folder "webapps" of the directory install of "Tomcat Server".
After that we start the "Tomcat server". During this start the server is going to deploy our new added "WAR" and you can see that in the "Tomcat terminal" like below :
Now we can call our web-service easily with any Internet browser using this URL :
http://[id address of the web-server]:[port number of the web-server]/[name of the job]_[version number]/services/[name of the job]?method=runJob
Which means with our job called "Issue_1_job" version "0.1" we will have this URL :
http://10.100.162.193:8090/Issue_1_job_0.1/services/Issue_1_job?method=runJob
We put the URL above in a browser and the we can see :
We can see that the line " <ns1:item
xsi:type="xsd:string">0</ns1:item>" has the value "0". This number is the return value of our job. And "0" means that the job has been run without any error.
In fact this URL run the job with the default values of the three parameters "input_file", 'output_file" and "attribute". To run the job with dynamic parameters we should add their values to the URL like this :
http://[id address of the web-server]:[port number of the
web-server]/[name of the job]_[version number]/services/[name of the
job]?method=runJob&arg1=--context_param%20[name of the 1st parameter]=[value of the 1st parameter] "&arg2=--context_param%20[name of the 2nd parameter]=[value of the 2nd parameter]&arg3...
If we suppose the next parameters values :
input_file = C:/Users/ELHASSMU/Desktop/issue%201/toto.csv
output_file = C:/Users/ELHASSMU/Desktop/issue%201/toto_out.csv
attribute = ToTo
Then the URL will become :
http://10.100.162.193:8090/Issue_1_job_0.1/services/Issue_1_job?method=runJob&arg1=--context_param%20input_file=C:/Users/ELHASSMU/Desktop/issue%201/toto.csv&arg2=--context_param%20output_file=C:/Users/ELHASSMU/Desktop/issue%201/toto_out.csv&arg3=--context_param%20attribute=ToTo
We put this URL in a web browser and we can see that the file is generated :
4. Calling the Job from a HTML page :
Now we are going to create an HTML page that will ask the user to input the value of the three parameters and then call the job using them.
The HTML page will contain two sections :
The first section is the input section. Which is a simple HTML form with three input fields and a button to call a Java-script function. Its code will be :
<form>
<p><label>Input file Path</label> : <input type="text" id = "if" name="if" size="30" /></p>
<p><label>Output file Path</label> : <input type="text" id = "of" name="of" size="30" /></p>
<p><label>Attribute</label> : <input type="text" id="att" name="att" size="30" /></p>
<input type="button" value="Call Issue_1 Job " name="button" onclick="callWebserice();" />
</form>
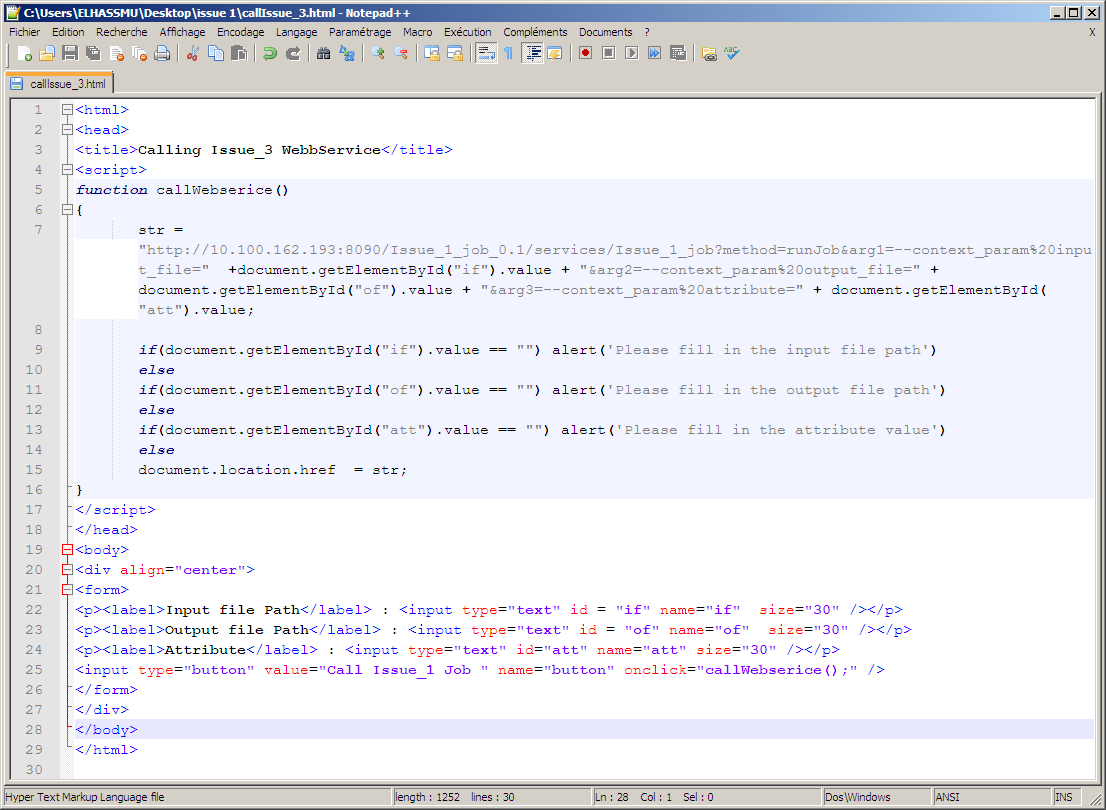
And the second section is the call service section. This one create the URL of the web-service and then call it. Its code is :
<script>
function callWebserice()
{
str = "http://10.100.162.193:8090/Issue_1_job_0.1/services/Issue_1_job?method=runJob&arg1=--context_param%20input_file=" +document.getElementById("if").value + "&arg2=--context_param%20output_file=" + document.getElementById("of").value + "&arg3=--context_param%20attribute=" + document.getElementById("att").value;
if(document.getElementById("if").value == "") alert('Please fill in the input file path')
else
if(document.getElementById("of").value == "") alert('Please fill in the output file path')
else
if(document.getElementById("att").value == "") alert('Please fill in the attribute value')
else
document.location.href = str;
}
</script>
As you can see we added some tests to be sure that all the fields have been set. If not a message alert will appear asking the user to fill in the field like this :
The whole code of the HTML page is :
Now let's try the HTML page in a browser and fill in the fields like above :
We click on "Call Issue_1 Job"and we get our output file with the added attribute :
4. Conclusion
This tutorial is done. thank you for reading it. And I hope I meet you in the next article.


Comments
Post a Comment